Category: Guides

Floor wrap guides: pricing, sizing, design ideas, safety and warehouse floor marking.

  • Dance floor wrap vs LED dance floor: which one fits your event?

    Dance floor wrap vs LED dance floor: which one fits your event?

    An LED dance floor is a rented floor that lights up. A dance floor wrap is a printed graphic that goes on top of a hard floor you already have. They solve different problems: LED is about light and motion in a dark room, and a wrap is about a custom design that looks the same in every photo. Here’s an honest side-by-side, including where a wrap is not the better choice.

    The short answer

    • Choose LED if the room will be dark, the party is the main event, and you want the floor to glow and change with the music.
    • Choose a wrap if you want names, a monogram, a logo, marble, a pattern or any custom artwork, and you want it to look sharp in daylight and in photos.
    • Choose a plain rented floor if you just need a surface to dance on and the look doesn’t matter much.

    How the options compare

    Floor wrapMonogram decalLED dance floorRented vinyl or parquet floor
    What it isPrinted graphic over the whole floorPrinted graphic in the centerRented floor panels with built-in lightsRented portable floor panels
    Needs underneathSmooth, hard floor (venue or rented)Smooth, hard floor (venue or rented)It is the floorIt is the floor
    PowerNoneNoneYes, ideally a dedicated circuitNone
    DesignAny artwork, edge to edgeAny artwork, in the middleLight patterns and colorsWhatever the rental company stocks
    Best inAny lighting, any photoAny lighting, any photoDim or dark roomsAny lighting
    Cost$8/sq ft shipped, $11/sq ft installed (our pricing)From $750 installed (our minimum)See reported ranges belowSee reported ranges below

    Look and feel

    An LED floor is at its best when the lights go down. The panels glow, shift colors and can run patterns in time with the DJ. In a bright room or an afternoon reception, that effect fades a lot.

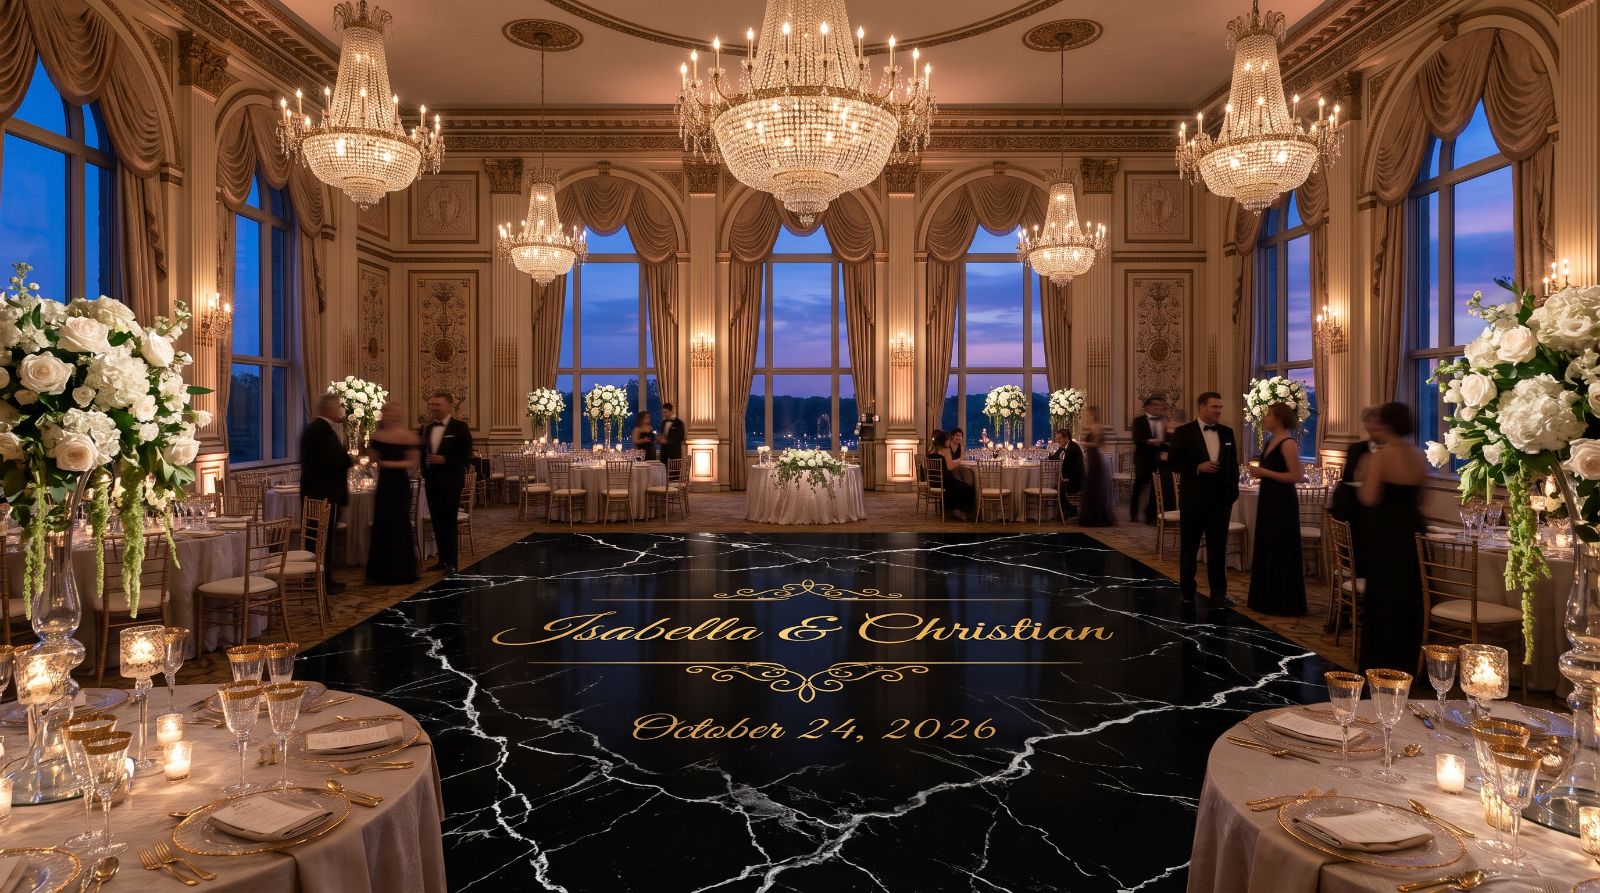
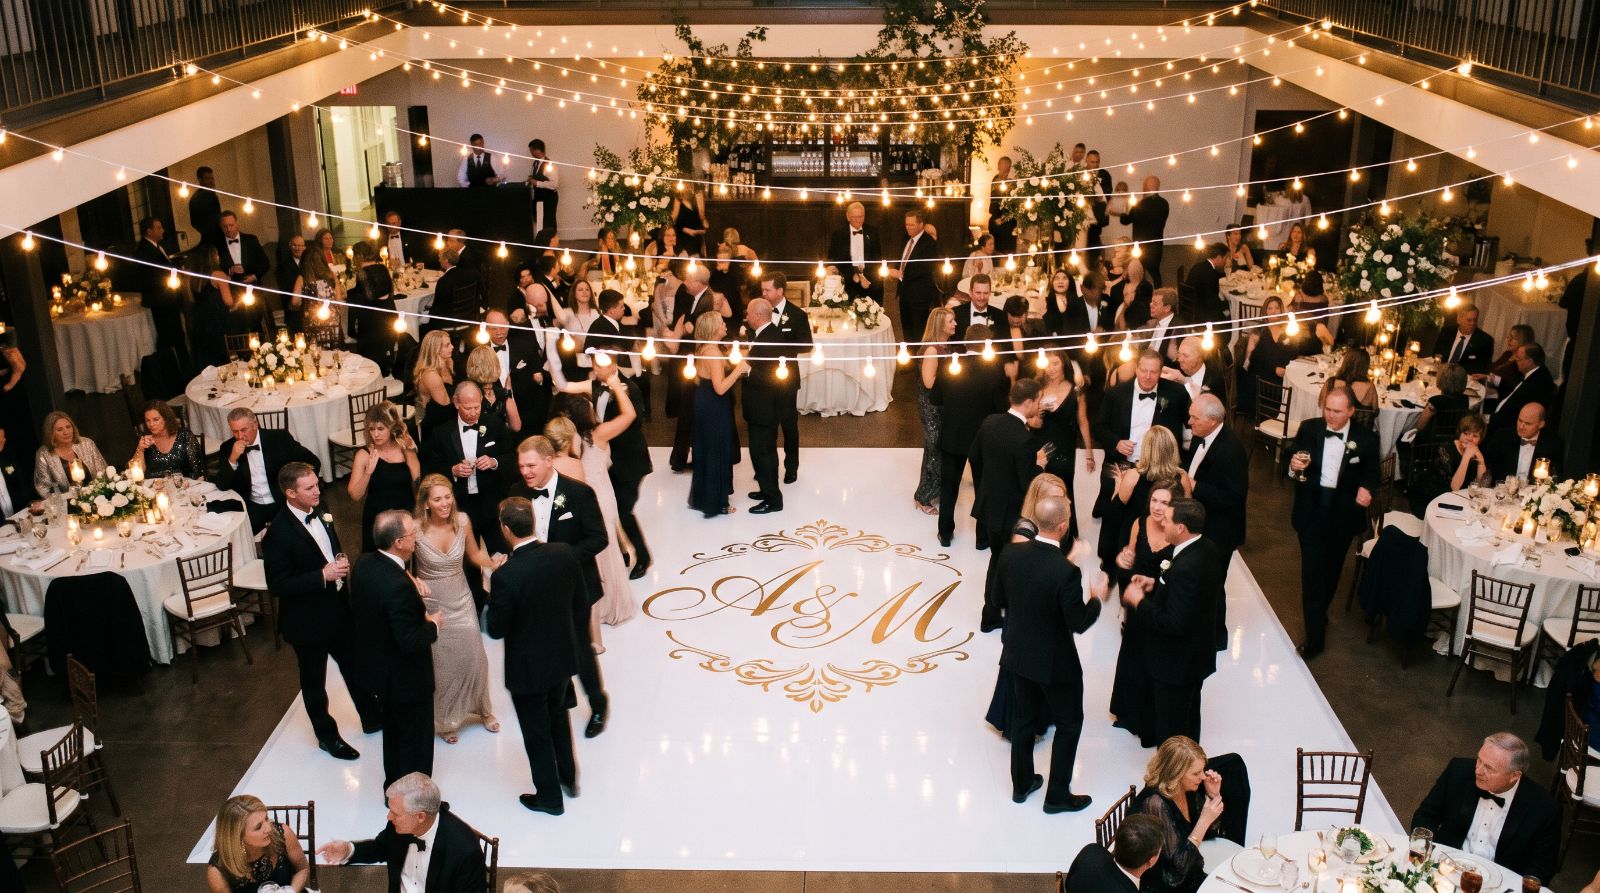
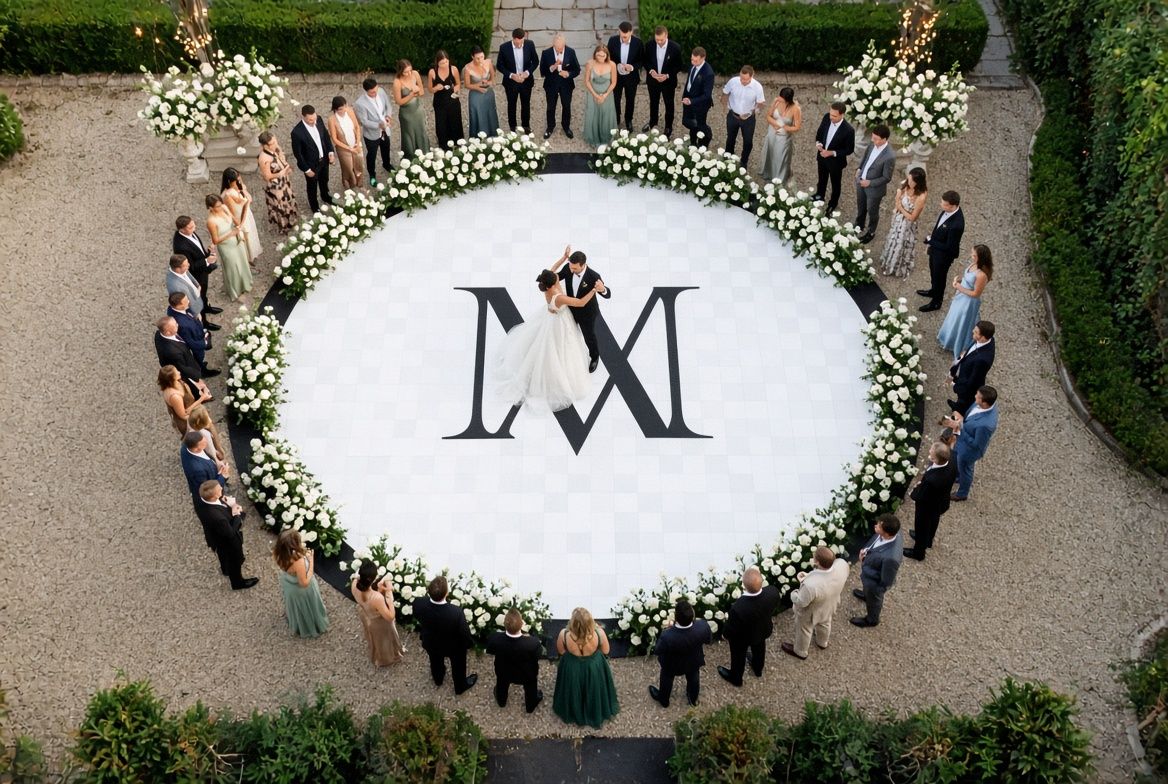
    A wrap is a printed image, so it looks the same at 4 pm as it does at 11 pm. It can carry details that light panels can’t, like a family crest, a full name, a marble texture or a photo. For ideas, see our wedding dance floor ideas, the checkerboard styles and the gallery of design concepts.

    What drives the cost

    LED dance floors

    LED floors are rented from event and party rental companies, and the price depends on size, the type of panel, delivery, setup and your date. We don’t rent LED floors, so here are figures other sources report:

    • Paperlust’s 2026 wedding dance floor cost guide lists LED light-up tile floors at about $1,000 to $3,000 or more for a mid-size install, and programmable LED video floors at about $3,000 to $8,000 or more.
    • Sky High Party Rentals, a Dallas rental company, lists a 16 x 16 ft LED floor from $2,400 for the shortest rental, before delivery, fees and tax.

    Prices in the Chicago area will vary, so get quotes from local rental companies for your date.

    Plain rented floors

    The same Paperlust guide puts a standard parquet or vinyl floor at about $600 to $900 for most couples, and a black and white checkered vinyl floor at about $400 to $900. For an outdoor floor on grass, it notes a subfloor can add $200 to $600.

    Floor wraps

    Our pricing is per square foot: $8 printed and shipped, or $11 printed and installed in Chicagoland, southeast Wisconsin and northwest Indiana, with a $750 minimum. A 16 x 16 ft floor is $2,048 shipped or $2,816 installed, and removal is $350. A monogram in the center, up to about 8 x 8 ft, is $750 installed. The full breakdown is in our dance floor wrap cost guide and on the pricing page.

    To be straight about it: a full wrap on a mid-size floor is not automatically cheaper than renting an LED floor. If budget is the deciding factor, a monogram decal on the venue’s existing floor is usually the lowest-cost way to get a custom look.

    A wrap needs a floor underneath

    This is the part people miss. A wrap goes on top of a smooth, hard surface: the venue’s own dance floor, sealed hardwood, tile or concrete, or a rented portable floor. It can’t go on carpet, grass or an open deck. If your venue has carpet, add the cost of a rented floor to the cost of the wrap before you compare. Our article on whether a wrap can damage the floor covers which surfaces work.

    An LED floor is the floor itself, so it brings its own surface. Ask the rental company what it can be set on and how it handles uneven ground.

    Power and setup

    LED floors need electricity. Rental guidance recommends a dedicated circuit rather than sharing one with the DJ or catering, since shared circuits are where breakers trip. Venues may also limit which outlets vendors can use, so confirm power with the venue early. LED floors also arrive as heavy equipment with wiring, and setup takes more time than laying a plain floor.

    A wrap needs no power. Our crew installs it before guests arrive, and we can come back to remove it after the event. Outside our install area, we ship it for you or your venue to install.

    Combining the two

    You don’t have to choose only one. A printed wrap would cover the lights on an LED panel, so they can’t share the same spot, but they can share the same event:

    • An LED floor for dancing, with a printed logo or monogram floor at the entrance, the bar or the photo spot
    • A wrapped dance floor for the ceremony, first dance and photos, with the DJ’s lighting doing the party work later
    • A rented plain floor with a monogram decal in the center, when the venue only has carpet

    For a quinceañera, sweet sixteen or mitzvah, the same mix works. See party dance floor ideas.

    Questions people ask

    Is a dance floor wrap cheaper than an LED dance floor?

    Not always. A small center monogram usually costs less than an LED rental. A full wrap on a mid-size floor can land in the same range as reported LED rental prices.

    Can you put a wrap on an LED floor?

    It would block the light, which defeats the point. Use them in different parts of the room instead.

    Does a wrap work in a dark room?

    Yes, though it shows whatever light is on it. Uplighting and the DJ’s lights will tint the design, which often looks good. Bold, high-contrast designs read best in low light.

    Where do you install?

    Across Chicagoland, southeast Wisconsin and northwest Indiana, and we ship anywhere in the US. See our service area, dance floor wraps and FAQ.

    Want to compare a wrap against the LED quote you already have? Call (630) 866-3673 or send your floor size, date and venue through the quote form, and we’ll send back an exact price.
  • Warehouse floor marking: decals vs paint vs tape (and which to use where)

    Warehouse floor marking: decals vs paint vs tape (and which to use where)

    Use tape or paint for long continuous lines like aisles and lane edges, and use printed floor decals for everything that carries information: signs, arrows, footprints, location numbers, PPE stops and logos. Paint is cheapest per foot but needs downtime to cure, tape goes down fast and can be moved, and decals do what neither can: print any shape, color or message. Here’s how they compare, and which colors to use for what.

    Paint vs tape vs decals at a glance

    FactorFloor paintFloor marking tapePrinted floor decals
    Best forLong permanent linesLines and boxes that may changeSigns, symbols, arrows, numbers, logos
    Material costLowest per foot of lineModerate per footHighest per square foot, lowest per message
    DowntimeTypically 24 hours for light traffic, up to about a week for vehiclesUsable right away; heavy traffic often after 24 hoursNo cure time; area is usable once installed
    Forklift trafficGood once cured; wears and stains in turning zonesHeavy-duty tapes made for it; edges can lift where tires turnFine for foot traffic; turning zones are hard on any applied graphic
    Changes laterHard to remove; old lines can show for yearsPeels up, easy to movePeels up and replace
    Detail and colorStencils only, limited colorsSolid colors and stripesAny design, text or symbol, full color

    The right answer is usually a mix. A typical layout uses tape or paint for the aisle lines and decals for the information the lines can’t carry.

    Floor paint

    Paint is the traditional option and still the lowest material cost for long runs. A striping crew can lay hundreds of feet of aisle line quickly.

    The tradeoff is downtime. Paint manufacturers typically call for about 24 hours before light foot traffic, around 72 hours before heavy foot traffic, and up to a week before vehicles with tires. In a running warehouse, that means closing aisles or working nights and weekends. Paint can also fade and stain under dragged pallets, and removing it later can mean grinding or chemical strippers. Old paint lines often stay faintly visible after removal.

    Paint makes sense for permanent long lines in areas where layout won’t change, and when you can afford the cure time.

    Floor marking tape

    Industrial floor tape goes down without a cure time, and heavy-duty versions are made for forklift traffic and pallet drags. When the layout changes, it peels up. That flexibility is why tape is popular in lean and 5S programs, where cells and staging areas get rearranged.

    Watch for edge lifting where tires turn and on dirty or unsealed concrete. Surface prep matters as much as the tape. Tape is best for aisle lines, cell outlines, staging boxes and anything you expect to move.

    Printed floor decals

    Floor decals are printed graphics, laminated with a textured protective layer and applied to the floor. They aren’t the cheapest way to make a long line. Where they win is anything that needs to say something.

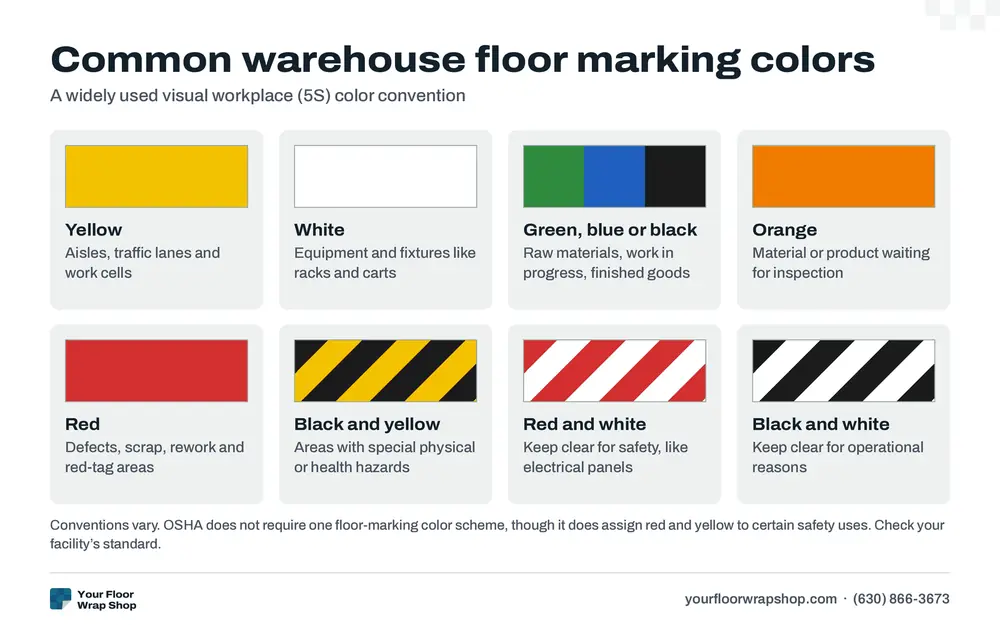
    Swatches of common 5S warehouse floor marking colors and what each typically marks, from yellow aisles to striped zones
    A widely used visual-workplace convention. Conventions vary; OSHA does not require one floor-marking color scheme.

    Where decals are the right tool

    • Directional arrows and one-way traffic signs at intersections
    • Stop signs and “look both ways” marks where pedestrian walkways cross forklift lanes
    • PPE stops: “safety glasses required beyond this point,” hearing or hard hat zones
    • Footprints and standing positions at stations, scanners or shipping counters
    • Location numbers for racking bays, dock doors and staging lanes
    • Keep-clear marks in front of electrical panels, fire extinguishers and eyewash stations
    • Corner marks and L-shapes for pallet positions
    • Company logos and branded wayfinding in visitor areas

    A decal can combine a symbol, a word and a color in one piece, which is much faster to read than a painted stencil. It’s also easy to update when a procedure changes.

    The common floor marking color convention

    There’s no single government-mandated color scheme for floor marking. In practice, many facilities follow a widely used visual-workplace convention, often associated with 5S programs:

    ColorCommonly used for
    YellowAisles, traffic lanes and work cells
    WhiteEquipment and fixtures like workstations, carts and racks
    Blue, green or blackRaw materials, work in progress and finished goods
    OrangeMaterial or product waiting for inspection
    RedDefects, scrap, rework and red-tag areas
    Red and white stripesKeep clear for safety or compliance, such as in front of electrical panels and fire equipment
    Black and white stripesKeep clear for operational reasons
    Yellow and black stripesAreas with physical or health hazards

    The point is consistency. Pick a scheme, write it down, post it, and use it the same way across the whole building.

    What OSHA actually says

    OSHA’s materials handling rule, 29 CFR 1910.176(a), says that “permanent aisles and passageways shall be appropriately marked.” It doesn’t say what color or what method. OSHA interpretations have said aisle lines can be any color, as long as they clearly mark the aisle and are used consistently. Width guidance commonly cited from OSHA interpretations is lines at least 2 inches wide.

    Color does come into play for hazards. OSHA’s safety color code, 29 CFR 1910.144, makes red the basic color for danger and fire protection equipment, and yellow the basic color for caution and marking physical hazards such as tripping, falling and striking against objects.

    You’ll sometimes see ANSI Z535 mentioned as a floor marking standard. Its focus is safety signs and colors, and floor marking guidance built on older editions is no longer considered current. For your own facility, check with your safety lead or consultant on what applies to you.

    We don’t make compliance claims for the decals we install. We make the graphics you specify, in the colors your safety plan calls for.

    Where we fit, honestly

    We measure, print and install floor decals for warehouses, plants and distribution centers across Chicagoland, southeast Wisconsin and northwest Indiana. That includes arrows, stop marks, PPE stops, footprints, location numbers, keep-clear zones and custom safety graphics. Our material supplier is a few minutes away, so local jobs can often be scheduled the same week. Commercial work is quoted per project. See commercial floor graphics for more.

    If your job is mostly long aisle lines across a large building, a striping contractor with paint or tape equipment is usually the better and cheaper choice for the lines. We’re a good fit for the decals that go with them.

    Questions people ask

    Are floor decals durable enough for a warehouse?

    Laminated floor decals hold up well to foot traffic and are commonly used in warehouses. Spots where forklifts turn sharply or pallets are dragged are hard on any applied graphic, so place decals just outside turning zones where you can.

    Does OSHA require yellow aisle lines?

    No. OSHA requires permanent aisles and passageways to be appropriately marked but doesn’t set an aisle color. Yellow is a common choice by convention. Red and yellow have defined meanings for danger and caution under OSHA’s safety color code.

    How long until we can drive on new floor markings?

    Paint typically needs anywhere from 24 hours to about a week depending on traffic type. Tape and decals don’t need cure time like paint does.

    Can decals go on unsealed concrete?

    Clean, smooth, sealed concrete gives the best bond. Dusty or unsealed concrete makes it harder for any adhesive to hold. Send photos of the floor and we’ll tell you what to expect.

    Can you print our own safety signs and logo?

    Yes. We print custom decals from your artwork or build the design for you.

    Planning floor markings for your facility? Call (630) 866-3673 or request a quote with your floor plan and a list of what needs marking.

  • Will a floor wrap damage the venue floor? Safety, slip resistance and removal

    Will a floor wrap damage the venue floor? Safety, slip resistance and removal

    On a clean, smooth, sealed and fully cured hard floor, a floor wrap made with removable adhesive is designed to come up without damaging the surface. Problems usually come from the wrong surface (carpet, unsealed concrete, a freshly refinished floor) or the wrong adhesive, not from the wrap itself. Here’s how to tell whether your venue’s floor is a good fit, what slip resistance means, and what to ask your venue before you book.

    Removable vs permanent adhesive

    Floor graphics are printed on vinyl with an adhesive backing, then covered with a protective floor laminate. The adhesive is the part that touches the venue’s floor, so it matters most.

    • Removable adhesive is made for temporary graphics. Material makers specify it for clean, smooth, sealed surfaces such as sealed concrete, commercial tile, vinyl, laminate, smooth ceramic tile and most cured, sealed wood floors. It’s meant to peel off cleanly.
    • Permanent adhesive is meant for long-term graphics, like a logo in a store entrance or a warehouse marker. Manufacturers generally don’t promise clean removal, and some residue may stay behind.
    • High-tack adhesive is a stronger type made for rough surfaces like commercial carpet, sidewalks and asphalt.

    For a dance floor that comes up after one night, you want removable adhesive. If you’re comparing providers, ask which adhesive and laminate they plan to use on your venue’s floor. A good provider will answer plainly.

    Which floors work and which don’t

    SurfaceGood fit?Notes
    Sealed hardwood (fully cured)YesMost common ballroom and event-hall floor. Must be clean and not freshly refinished.
    Portable dance floor panelsYesSmooth, hard and sealed. One of the best surfaces for a wrap.
    Ceramic or porcelain tileUsuallySmooth tile works. Deep grout lines and heavily textured tile can show through.
    Vinyl plank or commercial tileYesSmooth and sealed.
    Sealed or polished concreteYesCommon in lofts, breweries and industrial venues. Must be clean and dry.
    Unsealed or dusty concreteNoDust and porosity keep adhesive from bonding well.
    Freshly refinished or painted floorNot yetThe finish needs to be fully cured first.
    CarpetNot directlyNeeds a hard subfloor, like a portable dance floor, laid on top.

    Carpet

    A dance floor wrap goes on a hard surface. If the dance area is carpeted, the usual answer is a portable dance floor laid over the carpet and wrapped. Many venues own one; party rental companies rent them. Portable floors are commonly built from 3 x 3 ft or 4 x 4 ft panels, which also makes them easy to measure. See how to measure your dance floor.

    Freshly refinished wood

    New floor finishes take time to cure fully, even after they’re dry to the touch. Flooring guidance typically says to wait about 7 to 14 days for water-based polyurethane and 21 to 30 days for oil-based before putting rugs or tape on the floor. If your venue recently refinished the floor, ask when, and don’t apply anything until that cure window has passed.

    Waxed floors

    Wax and floor polish can keep adhesive from bonding well and can lift unevenly. Material makers recommend degreasing and cleaning waxed floors before applying graphics. Ask your venue whether the floor was recently waxed or polished.

    Slip resistance, explained

    Plain vinyl is smooth, and smooth gets slippery, especially with spilled drinks and dress shoes. That’s why floor graphics are covered with a floor laminate: a clear protective layer with a textured surface that adds grip and protects the print from scuffs.

    Our wraps are laminated with a textured slip-resistant floor laminate. Venues sometimes ask about slip resistance, and that’s a fair question.

    What UL 410 is

    UL 410 is a standard for slip resistance of floor surface materials. It measures the coefficient of friction of a surface, basically how much grip it has, in a lab setting using a test sample. It’s commonly referenced for floor graphic laminates, anti-slip films, floor coatings and finishes. Some laminate makers list UL 410 results on their spec sheets. Other slip-resistance measurements exist too, such as dynamic coefficient of friction testing under ANSI A326.3, which is commonly cited with a minimum value of 0.42 for interior floors.

    We don’t advertise a UL 410 rating or any other formal test result for our wraps. If your venue requires a specific rating, tell us up front so we can talk through options before anything is printed.

    Practical safety

    • Keep edges flat and fully pressed down. Lifted edges are the real trip hazard, not the graphic itself.
    • Wipe spills quickly, as you would on any dance floor.
    • Avoid wrapping right up to steps or ramps where people change level.

    Questions to ask your venue

    • Do you allow floor wraps or decals? Do you have rules on adhesive type?
    • What is the floor made of, and when was it last refinished, sealed or waxed?
    • Do you use a portable dance floor? What panel size, and how many panels?
    • Who is allowed to install and remove floor graphics? Does it need to be the installer?
    • When can vendors start setup, and when does the floor need to be clear?
    • Do you need a certificate of insurance or a material spec sheet from the vendor?

    What happens on removal day

    If you add removal, it’s $350 flat. We schedule it with you around your venue’s rules, so ask your venue when the floor needs to be clear. The wrap is lifted from the floor, rolled up and taken away. If your venue doesn’t require the installer to do it, your planner or venue staff can remove it instead. See our pricing page for the full list of prices.

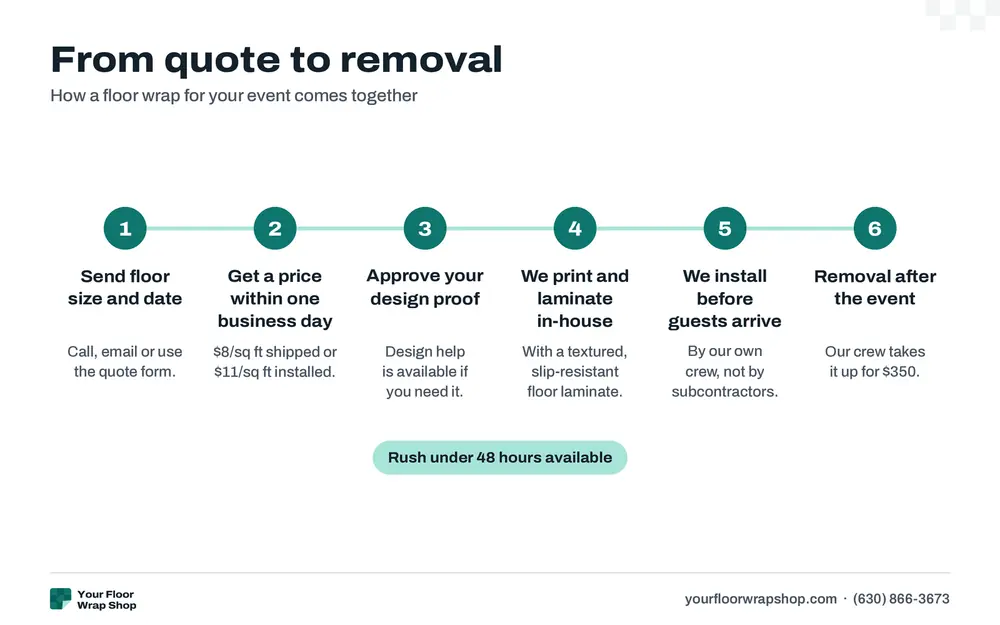
    Six-step floor wrap process: send size and date, get a price, approve proof, print, install, removal
    From quote to removal in six steps. Rush under 48 hours available.

    Email template for your venue coordinator

    Copy, paste and fill in the brackets:

    Subject: Floor wrap for our [date] event

    Hi [coordinator name], we’re planning a custom printed floor wrap for the dance floor at our [date] event. It’s a printed vinyl graphic with a textured slip-resistant laminate, applied to the dance floor and removed after the event. Could you tell us: (1) whether floor wraps are allowed, (2) what the dance floor surface is and whether it has been refinished or waxed recently, (3) whether you use a portable floor, and if so the panel size and how many panels, (4) who may install and remove it, and the setup and teardown times, and (5) whether you need insurance or spec sheets from the vendor. Our installer is Your Floor Wrap Shop, (630) 866-3673. Thank you, [your names]

    Questions people ask

    Will a floor wrap leave residue on a hardwood floor?

    On clean, sealed, fully cured hardwood, removable adhesive is designed to come off cleanly. Residue is more likely with permanent adhesive, a fresh finish, a waxed surface or a wrap left down far longer than planned.

    Can you put a floor wrap on carpet?

    Not directly. Carpet needs a hard subfloor, usually a portable dance floor, and the wrap goes on that.

    Are floor wraps slippery?

    Plain vinyl can be. That’s why floor wraps are covered with a textured floor laminate that adds grip. Our wraps use a textured slip-resistant floor laminate.

    Is your wrap UL 410 rated?

    We don’t advertise a UL 410 rating or other formal slip-resistance test result. If your venue needs one, tell us before ordering so we can discuss options.

    How much does removal cost?

    $350 flat, for installed wraps in our service area. If your venue allows it, your own team can remove it instead.

    Questions about your venue’s floor? Call (630) 866-3673 or request a quote with photos of the floor, and we’ll tell you whether it’s a good fit. More answers on our FAQ page.

  • Wedding dance floor wrap ideas: monograms, marble, florals and more

    Wedding dance floor wrap ideas: monograms, marble, florals and more

    The most popular wedding dance floor wraps are a monogram or crest in the center, a full marble or metallic finish, and a floral border framing the floor. The best choice is the one that matches your invitations and still reads clearly in a photo taken from above. Here are 26 ideas, grouped by style, with practical tips for each.

    Before you pick a design: four rules that matter in photos

    • Contrast beats detail. Fine script and thin lines disappear from a balcony or a photographer’s ladder. Go bold enough to read from 15 feet up.
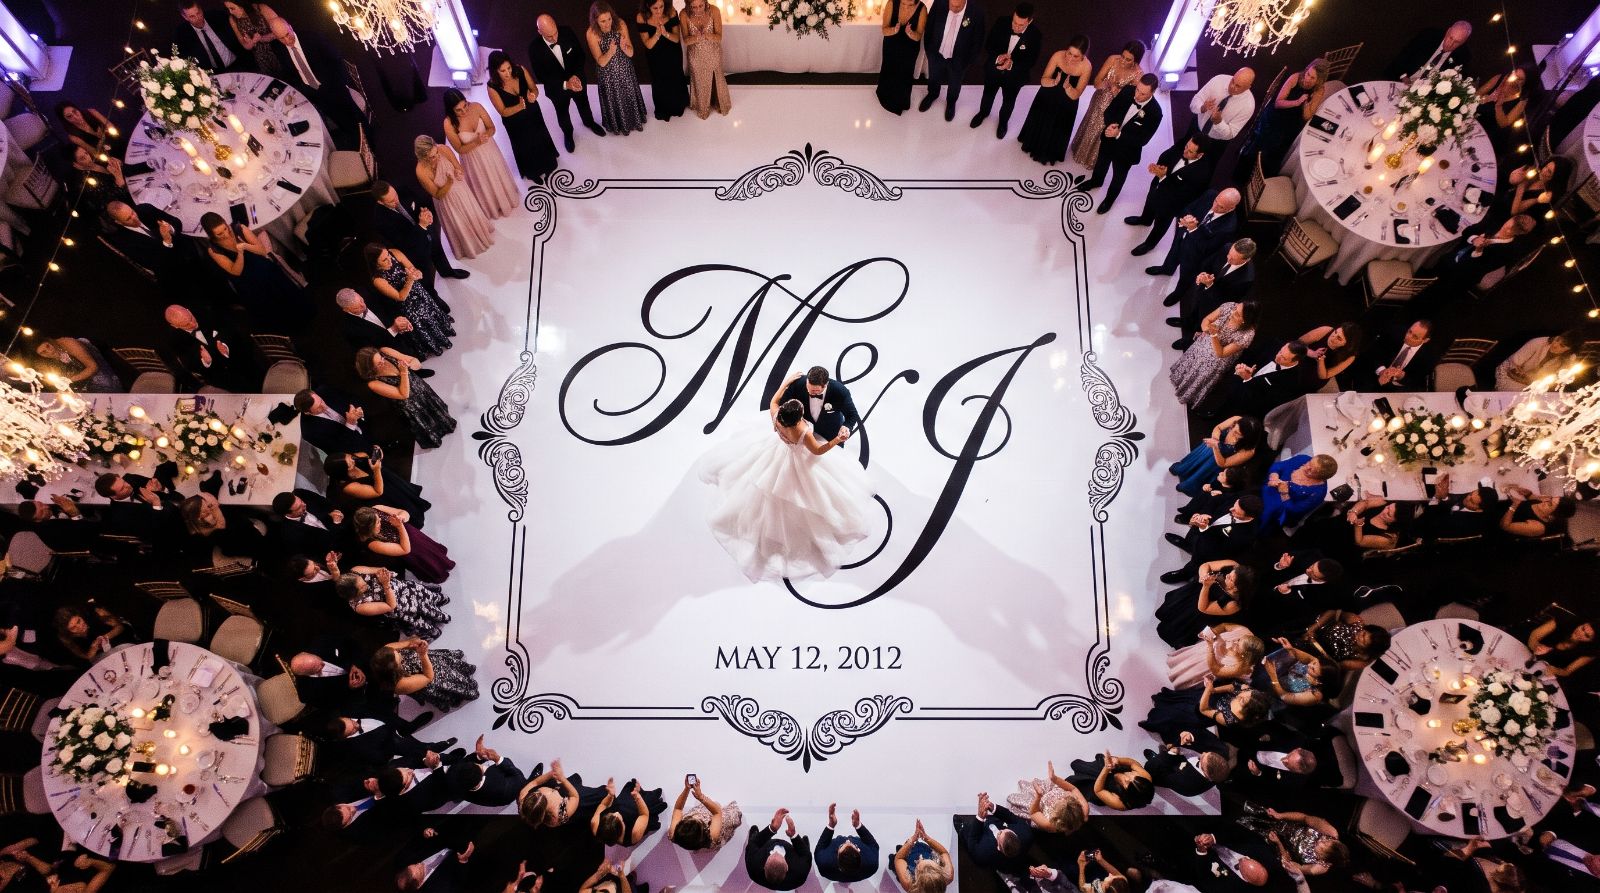
    • Face the monogram toward the head table or sweetheart table. That’s where most first-dance photos are taken from, and an upside-down monogram is an easy mistake to make.
    • Keep the center open. The first dance happens in the middle, so put the main graphic where you’ll actually be standing, or just behind you from the camera’s view.
    • Match the room, not just the theme. A white floor in a white ballroom can wash out. A darker floor in a dark barn can disappear. Ask your photographer what reads well in that venue.

    You can browse our gallery of design ideas to see these styles laid out. The images there are design concepts to spark ideas, not photos of past events.

    Classic monograms

    1. Initials and date in a simple circle

    The default for a reason. Two initials, an ampersand and the date inside a thin ring. Use a heavier ring than you think you need so it holds up in wide shots.

    2. Family crest or wreath monogram

    A laurel or leaf wreath around your initials feels formal and works well in ballrooms and historic venues. Keep the wreath to one or two colors.

    3. Single last-name initial

    One large letter centered on the floor. Clean, modern, and easy to read from anywhere in the room.

    4. Monogram on a solid color floor

    Cover the whole floor in one color, like deep navy, emerald or blush, with a white or gold monogram in the middle. Solid floors photograph cleanly and hide scuffs better than pure white.

    5. Small monogram on the venue’s own floor

    If the venue floor is already nice, skip full coverage and add a monogram in the center. It’s the most budget-friendly option, and you still get the overhead shot.

    Marble and metallics

    6. White marble with gold veining

    A popular luxe look. White with soft gray and gold veins works almost anywhere and pairs well with a gold monogram.

    7. Black marble

    Dramatic in evening ballrooms. Use a light-colored monogram for contrast, and keep veining subtle so it doesn’t fight with uplighting.

    8. Printed gold or rose gold leaf

    Printed metallic effects look like foil in photos without being reflective. Use them as accents, like a border or the monogram, rather than the whole floor.

    9. Art deco geometry

    Black, ivory and gold fan or sunburst patterns. Great for Gatsby themes and older Chicago venues with deco details.

    10. Checkerboard

    Black and white checks are classic for a retro or modern-minimal wedding. Large squares, around 2 ft, read better in photos than small ones.

    Garden and floral

    11. Floral border, open center

    A ring of flowers around the edge with a plain center. It frames the couple during the first dance and keeps the middle uncluttered.

    12. Watercolor wildflowers

    Soft, scattered wildflowers across the whole floor. Best in daytime or bright venues; muted watercolor colors can go flat under dim lighting.

    13. Greenery and eucalyptus

    Sage, olive and white. Pairs with garden, greenhouse and tented weddings and doesn’t compete with real florals on the tables.

    14. Single oversized bloom

    One huge peony, rose or magnolia filling the center of the floor. Bold, simple, and very photogenic from above.

    Rustic and natural

    15. Weathered wood plank

    A printed wood look for barn and farm venues, with your initials as a branded mark in the center. Useful when the real floor is concrete or mismatched panels.

    16. Lake or river map

    A stylized map of where you met, got engaged or are getting married. A Lake Geneva or Lake Michigan shoreline is a nice touch for local couples.

    17. Kraft paper and twine

    Warm tan background with hand-lettered names. Simple and relaxed, and it pairs with letterpress or kraft stationery.

    Modern and minimal

    18. Solid floor, tiny detail

    One color edge to edge with a small mark in one corner. Very clean, and the color does the work in photos.

    19. Line art portrait

    Single-line drawing of the two of you. Keep it large and the line weight heavy so it reads at a distance.

    20. Terrazzo

    Speckled terrazzo in your wedding colors. Playful but still grown up, and it hides wear well.

    Cultural celebrations

    21. Hora-friendly center

    For a Jewish wedding, keep the center wide open with a design that frames a large circle, so the hora has room and looks intentional in photos.

    22. Mandala or rangoli-inspired pattern

    Symmetrical designs in rich colors suit South Asian celebrations and photograph beautifully from overhead.

    23. Folk embroidery border

    Patterns inspired by Ukrainian, Polish, Mexican or other folk textiles make a meaningful border around a monogram. Bring a photo of the family textile and we can work from it.

    24. Quinceañera or sweet sixteen crest

    Name, number and a crown or flourish in the honoree’s colors. Works for the first waltz and the full party afterward.

    Kids and fun

    25. Vinyl record or dance club floor

    A giant record or retro light-up floor look for the after-party crowd.

    26. Hopscotch or game border

    If many kids are coming, a hopscotch strip or game pattern near the edge keeps them busy without cluttering the dance area.

    Practical tips before you order

    • Get the floor size first. Use our guide to measuring your dance floor, because design proportions depend on it.
    • Send your invitation or a color sample. Matching your existing suite is the fastest way to a design you’ll love.
    • Ask for a proof sized to the real floor. Small details that look fine on a phone can be too small at full scale.
    • Plan for lighting. Uplighting tints the floor. Colored lights on a white floor turn it that color, which can be a feature.
    • Think about the last dance too. Whatever is on the floor will be in candid shots all night.
    Six-step floor wrap process: send size and date, get a price, approve proof, print, install, removal
    From quote to removal in six steps. Rush under 48 hours available.

    What design costs

    If you have artwork, there’s no design fee. If you want us to build the design from scratch, it’s $150 flat. The wrap itself is $8 per square foot shipped or $11 per square foot installed in Chicagoland, southeast Wisconsin and northwest Indiana. See pricing or how much a dance floor wrap costs for examples.

    Questions people ask

    Which way should the monogram face?

    Toward the head table or sweetheart table, so it reads right-side-up in photos taken from there. If the photographer will shoot from a balcony or stage, tell us and we’ll orient it to that view.

    What colors photograph best on a dance floor?

    High contrast pairs: navy and white, black and gold, emerald and ivory. Pale-on-pale designs like blush on ivory can look washed out under dim reception lighting.

    Can I use my invitation monogram?

    Yes. Send the file your stationer made. Vector files (AI, EPS, SVG or PDF) print best at large sizes, but we can work from what you have.

    Can the design include our names and wedding date?

    Yes. Names, date, a hashtag, a short quote or a meaningful map are all common additions. Keep text large enough to read from across the room.

    Can we see the design before it’s printed?

    Yes, and you should. Ask for a proof drawn to your floor’s real size so you can check orientation, colors and text size before anything is printed.

    Have a style in mind? Call (630) 866-3673 or request a quote with your floor size, date and any inspiration images, and we’ll help you turn it into a design.

  • How big should your dance floor be, and how to measure it for a wrap

    How big should your dance floor be, and how to measure it for a wrap

    Plan on roughly 4.5 square feet for each person dancing, and expect about 40 to 50 percent of wedding guests to be on the floor at the busiest moment. For 100 guests, that works out to about 180 to 225 sq ft, or a floor around 14 x 14 ft to 15 x 15 ft. Below is a guest-count table, how portable floor panels affect the final size, and exactly how to measure for a wrap.

    The rule of thumb, and the math

    Event planners and rental companies typically size dance floors at about 4 to 5 square feet per dancer, with 4.5 sq ft the most common working number. That’s enough room to move without bumping elbows, but tight enough that the floor feels full.

    The second number is how many guests dance at once. Not everyone is up at the same time. Published guidance typically puts it at 30 to 40 percent for a general party, and 40 to 50 percent for weddings and other high-energy events. Corporate events usually run lower.

    So the formula is:

    • Guests x share dancing = peak dancers
    • Peak dancers x 4.5 sq ft = floor area
    • Round to a size that fits the room and the panels

    Example for 150 wedding guests: 150 x 0.40 = 60 dancers, and 150 x 0.50 = 75 dancers. 60 x 4.5 = 270 sq ft and 75 x 4.5 = 338 sq ft. A 16 x 18 ft floor (288 sq ft) or an 18 x 18 ft floor (324 sq ft) fits that range.

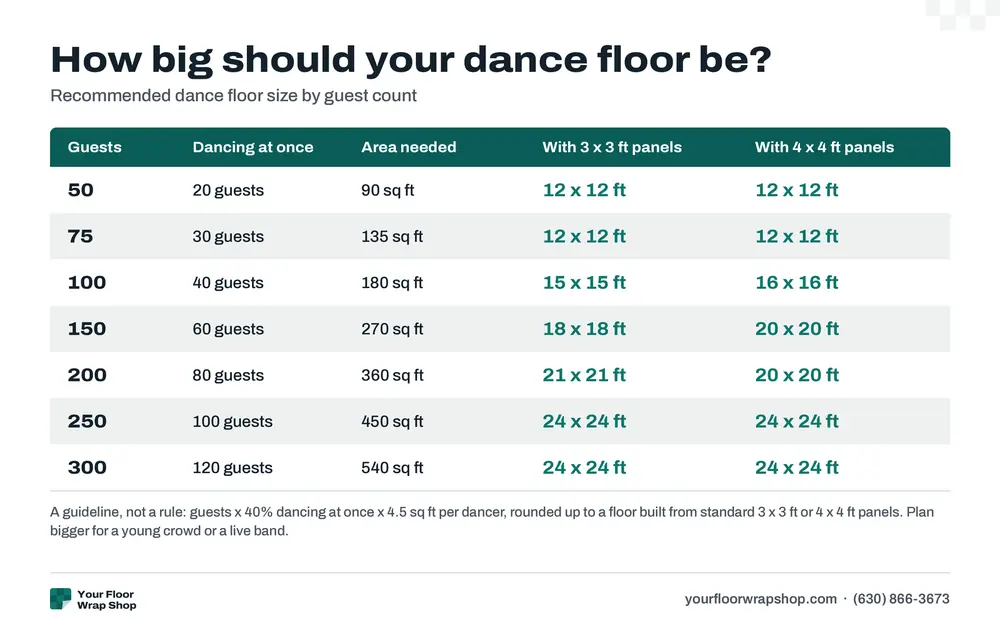
    Dance floor size by guest count

    These figures assume a wedding crowd (40 to 50 percent dancing at peak) and 4.5 sq ft per dancer.

    Chart of dance floor sizes by guest count, 50 to 300 guests, using 3x3 ft and 4x4 ft floor panels
    Rule of thumb: guests x 40% dancing at once x 4.5 sq ft per dancer, rounded up to a panel-built floor size. A guideline, not a rule.
    GuestsPeak dancersArea neededCommon floor sizes
    5020 to 2590 to 113 sq ft10 x 10 ft or 10 x 12 ft
    7530 to 38135 to 171 sq ft12 x 12 ft or 12 x 14 ft
    10040 to 50180 to 225 sq ft14 x 14 ft or 15 x 15 ft
    15060 to 75270 to 338 sq ft16 x 18 ft or 18 x 18 ft
    20080 to 100360 to 450 sq ft20 x 20 ft or 20 x 22 ft
    250100 to 125450 to 563 sq ft21 x 21 ft or 24 x 24 ft
    300120 to 150540 to 675 sq ft24 x 24 ft or 24 x 28 ft

    When to go bigger or smaller

    • Go bigger if your crowd loves to dance, you have a live band, or you’re planning cultural dances where the whole room joins in, such as a hora or a large circle dance.
    • Go smaller if many guests are older, the event is mostly cocktail-style, or a large share are kids who’ll be in and out.
    • Don’t oversize. A floor that’s too big looks empty in photos and costs more to wrap. A slightly snug floor feels busier and more fun.

    Portable dance floor panels change your size

    Many venues don’t have a built-in dance floor. They lay a portable floor made of interlocking panels, often over carpet. Rental and commercial portable floors are commonly built from 3 x 3 ft or 4 x 4 ft panels, with a trim edge around the outside.

    That means the floor only comes in certain sizes:

    • With 3 x 3 ft panels: 12, 15, 18, 21, 24 ft and so on
    • With 4 x 4 ft panels: 12, 16, 20, 24, 28 ft and so on

    So if the math says 300 sq ft, the venue might set an 18 x 18 ft floor with 3 ft panels or a 16 x 20 ft floor with 4 ft panels. Ask your venue which panels they use and how many they have, then pick the closest size. That number, not the formula, is what your wrap is printed to.

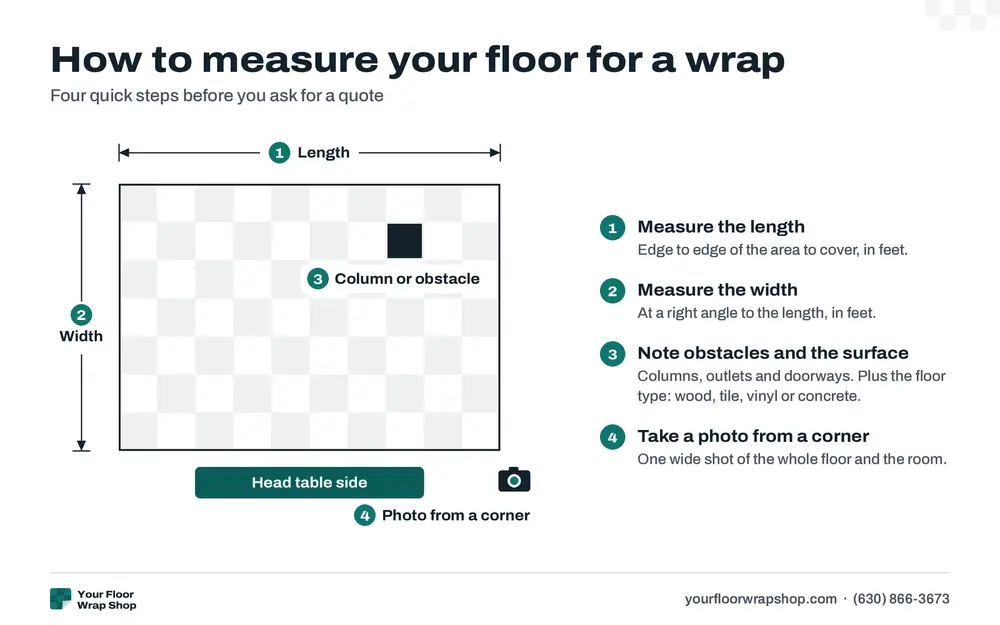
    How to measure your floor for a wrap

    If the floor already exists, measure it in person if you can. If it’s a portable floor that isn’t set up yet, get the panel size and count from the venue.

    Floor plan diagram showing length and width, a column, the head table side and a corner photo spot, with 4 steps
    Measure length and width in feet, note obstacles and the floor surface, and send a photo taken from a corner.
    • Use a tape measure or laser measure, not a phone app. Phone measuring apps are fine for a rough idea but less reliable over a long floor.
    • Measure the width wall-to-wall or edge-to-edge of the dance area at the front, middle and back. Write down all three.
    • Do the same for the length on the left, center and right.
    • Use the smallest numbers. Floors and rooms are rarely perfectly square, and a wrap that’s slightly smaller than the floor looks clean, while one that’s too big has to be trimmed on site.
    • On a portable floor, measure the panel area inside the trim and note the trim width separately. Count the panels in each direction as a check: 6 panels of 3 ft should equal 18 ft.
    • Note anything that sits on the floor: DJ booth, stage edge, columns, floor outlets, a step down or threshold.
    • Mark where the head table, sweetheart table or stage sits relative to the floor. This decides which way your monogram faces.
    • Write down the floor material: hardwood, tile, sealed concrete, vinyl plank, portable panels or carpet.

    If the dance area is carpeted, the wrap goes on a hard subfloor laid on top, not on the carpet itself. See will a floor wrap damage the venue floor? for which surfaces work.

    Photo checklist to send us

    Good photos save a site visit and prevent surprises. Send these with your quote request:

    • One wide photo of the whole dance area from a corner
    • One straight-on photo from where the head table or stage will be
    • A close-up of the floor surface, with a coin or your shoe for scale
    • A close-up of any seams, panel edges or trim
    • Any obstacles: columns, outlets, ramps, thresholds, built-in stages
    • A photo of the venue’s floor plan or layout diagram if they have one
    • Your measurements written on a sketch, even a rough one on paper

    Also include the venue name and address, your event date, your setup window (when the room opens to vendors), and guest count.

    From size to price

    Once you have the size, pricing is simple: square feet times $8 shipped or $11 installed (with a $750 installed minimum). A 16 x 16 ft floor is 256 sq ft, so $2,048 shipped or $2,816 installed. See how much a dance floor wrap costs for a full table, or go straight to our pricing page.

    Questions people ask

    How many square feet per person do you need on a dance floor?

    The common working number is about 4.5 sq ft per dancer, with a typical range of 4 to 5 sq ft. Multiply that by the number of people you expect dancing at once, not your full guest count.

    What percentage of guests dance at a wedding?

    Typically 40 to 50 percent at the busiest moment of a wedding. General parties tend to run 30 to 40 percent and corporate events lower.

    What size dance floor do I need for 150 guests?

    About 270 to 338 sq ft, which fits a 16 x 18 ft or 18 x 18 ft floor. Final size depends on the venue’s panels and room layout.

    Can you wrap a floor that’s an odd size or shape?

    Yes. The wrap is printed to your measurements, so a 14 x 19 ft floor or an unusual shape is fine. If there is a column or built-in stage, tell us and we will plan the design around it. Accurate measurements and photos matter more in those cases.

    What if the venue hasn’t decided on the floor size yet?

    Ask which panel size they use and how many they have. That narrows it to a few possible sizes. We can quote a likely size and confirm before printing.

    Have your measurements or photos ready? Call (630) 866-3673 or request a quote, and we’ll confirm the size and send a price.

  • How much does a dance floor wrap cost? (2026 pricing, Chicago and shipped)

    How much does a dance floor wrap cost? (2026 pricing, Chicago and shipped)

    A custom dance floor wrap from us costs $8 per square foot printed and shipped for you to install, or $11 per square foot printed and installed by our crew in Chicagoland, southeast Wisconsin and northwest Indiana, with a $750 minimum for installed jobs. A typical 16 x 16 ft wedding floor runs $2,816 installed, or $3,166 with removal after the event. Below you’ll find a size-by-size table, what actually moves the price, and honest ways to spend less.

    Our current prices

    These are the same numbers on our pricing page. No packages, no tiers to decode.

    ItemPrice
    Printed and shipped (you install)$8 per sq ft
    Printed and installed (Chicagoland, SE Wisconsin, NW Indiana)$11 per sq ft, $750 minimum
    Removal after your event$350
    Design from scratch$150 flat
    Rush (under 48 hours)+25%
    Installs outside our core areaQuoted with travel

    Home floors and commercial projects are quoted individually, because surface prep, layout and traffic vary much more than they do on a dance floor.

    Dance floor wrap prices by size

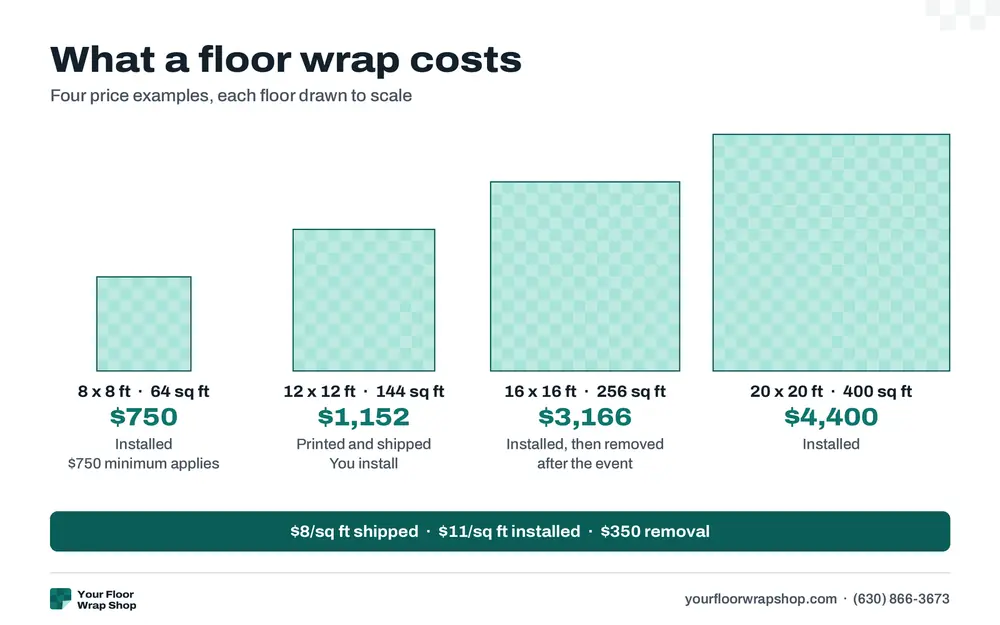
    Square footage is width times length. A 16 x 16 ft floor is 256 sq ft, so it’s 256 x $8 = $2,048 shipped, or 256 x $11 = $2,816 installed. Add $350 if you want us back to pull it up after the party.

    Four floor wrap price examples drawn to scale: 8x8 ft $750, 12x12 ft $1,152, 16x16 ft $3,166, 20x20 ft $4,400
    $8/sq ft printed and shipped, $11/sq ft installed ($750 minimum), $350 removal after the event.
    Floor sizeSq ftShipped (you install)InstalledInstalled + removal
    8 x 8 ft64$512$750 (minimum)$1,100
    10 x 10 ft100$800$1,100$1,450
    12 x 12 ft144$1,152$1,584$1,934
    14 x 14 ft196$1,568$2,156$2,506
    16 x 16 ft256$2,048$2,816$3,166
    18 x 18 ft324$2,592$3,564$3,914
    20 x 20 ft400$3,200$4,400$4,750
    24 x 24 ft576$4,608$6,336$6,686

    Not sure which row is yours? Our guide on how big your dance floor should be and how to measure it walks through guest counts and panel sizes.

    What drives the cost

    1. Size

    Price is per square foot, so size is the biggest lever by far. Going from a 16 x 16 ft floor to 20 x 20 ft adds 144 sq ft, which is $1,584 more installed. That’s why it pays to know the real size of the floor before you fall in love with a full-coverage design.

    2. Installed or shipped

    Installed costs $3 more per square foot than shipped. What you get for that difference: our own crew lays the wrap, lines up seams, works out bubbles and trims the edges on site. Shipped is the right call for small floors and for anyone outside our install area. Larger floors are harder to lay well on your own, especially with seams and a tight window before guests arrive.

    3. Removal

    Removal is a flat $350. Some venues are fine with your planner or rental company pulling the wrap up; many want it handled by whoever installed it, and some need the floor clear the same night. Ask your venue before you decide. If you’re shipping and self-installing, removal is on you.

    4. Design

    If you already have artwork, or you want a monogram from your invitation suite, there’s no design charge. If you want us to build the design from scratch, it’s $150 flat for the project, not per hour. Browse the gallery for design ideas to start from.

    5. Rush

    Anything under 48 hours is +25%. On a 16 x 16 ft installed floor ($2,816), that’s about $704 extra. Because our material supplier is a few minutes away, local installs often happen the same week anyway, so most people never need rush if they reach out a week or two ahead.

    6. Carpet and uneven floors

    A floor wrap needs a smooth, hard surface. If the dance area is carpeted, you’ll need a hard subfloor first, usually a portable dance floor rented from the venue or a party rental company. That rental is a separate cost from the wrap. Ask your venue what they have on hand before pricing anything else.

    7. Location

    Inside Chicago and the suburbs (Cook, DuPage, Lake, Kane, McHenry and Will counties), southeast Wisconsin and northwest Indiana, installed pricing is the per-foot rate above. Farther out, we quote with travel. Check the service area page for the towns we name.

    Three worked examples

    Small floor, shipped: 12 x 12 ft

    144 sq ft x $8 = $1,152. You get a printed, laminated wrap shipped to you, and you or your venue team install it. Good for intimate weddings, backyard parties and anyone outside our install area.

    Typical wedding floor, installed and removed: 16 x 16 ft

    256 sq ft x $11 = $2,816, plus $350 removal = $3,166. Add $150 if you want us to design the artwork from scratch, for $3,316 total.

    Large floor, installed: 20 x 20 ft

    400 sq ft x $11 = $4,400. Add removal and the total is $4,750.

    How to spend less (honestly)

    Wrap the center, not the whole floor

    You don’t have to cover every inch. A monogram or crest in the middle of the venue’s existing floor gets you the same photo from above for a fraction of the cost. An 8 x 8 ft center piece installed is $750, compared with $4,400 to cover a 20 x 20 ft floor edge to edge.

    Use the minimum you’re already paying for

    Installed jobs have a $750 minimum, which covers about 68 sq ft at $11. If your design is smaller than that, you can size it up to roughly 8 x 8.5 ft at no extra cost.

    Ship and self-install small floors

    For a small, simple floor, shipping saves $3 per square foot. On a 10 x 10 ft floor that’s $800 shipped versus $1,100 installed. Shipping makes less sense for large floors with seams or when you only get a short setup window.

    Bring finished artwork

    If your stationer or designer already made a monogram, send the file. That skips the $150 design fee.

    Book early enough to avoid rush

    Rush adds 25%. Reaching out a week or two ahead usually avoids it entirely.

    Measure before you quote

    An accurate size stops you from paying for square footage that ends up under a DJ booth or past the trim. Venue floors are often built from 3 x 3 ft or 4 x 4 ft panels, so the real size may differ from what you remember.

    A note on prices you’ll see online

    You’ll see a wide range online for dance floor wraps, from cheap print-only decals to full-service packages with a big number and no breakdown. When you compare, check what’s included: lamination, installation, removal, design and travel. A low per-foot price that doesn’t include installation or removal can end up costing more than it looks.

    Questions people ask

    Is the installed price per square foot including installation labor?

    Yes. $11 per square foot covers printing, lamination and installation by our crew in Chicagoland, southeast Wisconsin and northwest Indiana, with a $750 minimum. Removal is a separate $350.

    Why is there a $750 minimum?

    Every install includes the same trip, setup and crew time whether the floor is small or large. At $11 per square foot, the minimum covers about 68 sq ft, so most small center pieces land right at $750.

    Can I get a wrap shipped outside Illinois?

    Yes. We ship printed wraps anywhere in the US at $8 per square foot for you to install. Installed work outside our core area is quoted with travel.

    Do I have to pay for removal?

    Only if you want us to do it. Removal is $350. Check with your venue first, since some require the installer to remove it or need the floor cleared by a set time.

    Does the price change for home or commercial floors?

    Home floors and commercial projects are quoted individually. See home floor wraps and commercial floor graphics for details.

    Want an exact number for your floor? Call (630) 866-3673 or request a quote with your floor size, date and venue, and we’ll send back a price.